Showing posts with label Cleaning. Show all posts

Sunday, August 22, 2010

Dear, where are the bungee cords?

I called my husband at work Friday to ask him where the bungee cords were.....so I could secure this...


my very own redneck dryer, I mean inside laundry line made of cotton yarn and attached to the wall with bungee cords. I have been trying to get back in the habit of line drying all of our clothes because our electric bill has gone through the roof since John was born. Some of it is the air conditioning, which I can't do anything about because of the kids' heat rashes. I think a lot of it is the dryer though because it vents through the roof, which makes it terribly inefficient. I have to dry loads for at least 2 full cycles! There is a special fan we could get, but I am kind of on the fence about it at the moment and would like to see how much we might potentially save with the fan versus line drying. So, I have been line drying all this month with the exception of two cycles; however, due to all of the tropical storms and intense humidity this has proven to be quite difficult. It is a sad day indeed when you hang wet clothes out to dry and they won't dry because it is too humid!!!!

Thursday, January 28, 2010

Spring Has Sprung.....Diapers!!!!

I am not sure what this says about me, but I was totally excited to strip all of our cloth diapers and hang them on the line to dry outside!

Only the covers are pictured....don't they look so cheerful??

I have done both line drying and dryer drying, and I have to say, line drying is definitely best for your diapers. However, I have heard an occasional tumble in the dryer can reset your waterproof layer from time to time as it breaks down!

Sunday, September 13, 2009

Money Saving Monday: Making Soap!

This weekend I finally took the beef fat (tallow) out of the freezer and made soap the old fashioned way (using fat, lye, and water)! This was my first time making soap. I might have over done it on the safety gear! It really wasn't as dangerous or as messy as people make it look as long as you know what you are doing (which I did since I had read Soap by Ann Bramson).

Me all decked out in my safety gear!

I chose to make castile soap. It called for 32 oz of water, 11 oz lye, 60 oz tallow, and 26 oz of olive oil. The ounces are measured using a scale NOT fluid ounces. This is very important!!!

The lye mixture

First I measured out the lye and water into a glass bowl that I had placed in the sink. Lye mixed with water gets very hot, very quickly so I didn't want to have to move the container after mixing it! It was also important to stir the mixture with a wooden spoon to make sure it got mixed well. Next I combined the tallow and olive oil by heating it in a large pot.
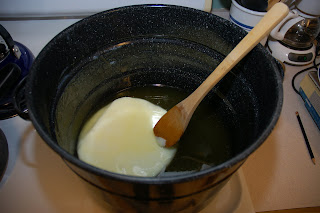
Combining the tallow and olive oil.

It is also very important what types of containers and spoons you use, because the lye mixture can "melt" aluminum pans due to its caustic nature. I chose to use an enamel pot (although I think you can also use stainless steel), a glass bowl (due to the intense heat), and a wooden spoon. Once the lye mixture and the oil mixture were both between 95 and 98 degrees, I combined them by slowly pouring the lye mixture into the oil mixture while stirring constantly. I stirred the mixture until it traced (meaning you could draw pictures with the droplets falling off the spoon), which took about an hour.

To protect my counter tops, I put down a towel covered with wax paper. It really wasn't that messy. Next time I might just lay down a towel.

Finally I used a stainless steel measuring cup to scoop the soap out into a bunch of old 8 oz sour cream containers (and a few butter containers when I ran out!) I covered them with the lids and placed towels on top of the containers to trap in the heat.

The final product!

The next day I uncovered them and found this beautiful soap!! It needs to cure for at least 2-4 weeks before it will be ready to use. Currently it is laying out uncovered on top of my kitchen cabinets with a light towel over them to keep out dirt. In about a month, I will take the soap out of the molds. There may be a light, white dust covering the soap. This is called washing soda, basically a more intense form of baking soda. I can either use it as is or try to dust some of it off to use in the laundry. I personally wouldn't use it for cooking. I suppose there isn't anything wrong with it, but I am just not comfortable with it!

And there you have it! My first attempt at making soap! It was much easier than I had anticipated! It was also fun, educational, AND economical! What more can you ask for?!?!?! I already had pretty much all of the supplies in my kitchen, and the ingredients cost me very little in comparison to purchasing soap! The expense of making soap really comes down to how much you are willing to spend. The next recipe I would like to try would only cost me the price of the lye, unless I choose to make my own lye. Hmmmm.....now there's a thought! Oh and if you were wondering what my husband's reaction was to all of this, he said, "Wow, it actually feels like soap!"

Wednesday, June 17, 2009

Reusable Swiffer Pads and Swiffer Dusters

I have mentioned several times before that I do NOT like cleaning! I love anything that makes the job easier when it absolutely MUST be done! Two tools I have fallen in love with are the Swiffer Wet Jet and the Swiffer Duster. The Swiffer Wet Jet is light weight with a lot of maneuverability. I particularly enjoyed it during my last pregnancy! The Swiffer Duster can be extended to reach high ceiling fans and is able to get into tight, hard to reach places. Again, I particularly enjoyed it during my last pregnancy! However, being the frugal person that I am, I do not like having to constantly buy disposable pads and dusters! Therefore, I got out my sewing machine, an old towel, an old t-shirt, and got to work creating my own washable Swiffer Wet Jet pads and Swiffer dusters!


To make the duster, I used an old t-shirt to cut out 7 rectangular pieces with fringe.


This is probably an unnecessary step, but I decided to put Fray Check around the edges.


Next I stitched each piece down the center to the center region of the base piece.


You can see the stitches I made on the back of the base piece. Finally I stitched some elastic on the back to slip the Swiffer Duster into.


To make the Wet Jet pad, I took an old towel and cut it so the Wet Jet would fit in the center.


Last I sewed the towel together like a mattress sheet.

I have used the wet jet pad multiple times and absolutely love it! The duster also works well but the disposable one is less bulky and does not attract dust quite as easily. However, it still works well enough that I would use my homemade version instead of buying more disposables.

Thursday, June 4, 2009

Homemade Dishwasher Detergent

We have a dishwasher, but it doesn't work very well. Typically I wash all of our dishes by hand and use our dishwasher as a giant dish drainer. Periodically, when it gets full, I run it more for sterilization purposes than anything. Recently, I discovered that I had run out of dishwasher detergent and found a great recipe for powdered dishwasher detergent on Thrifty Fun. It worked really well, and it uses ingredients we typically keep around our house!


You put equal parts of baking soda and borax in the soap dispenser in your dishwasher. (You can keep this premixed in a container.) Then sprinkle a little Fruit Fresh on top. (You should NOT add this to a premixed batch as it might cause it to get chunky.)


Then turn on your dishwasher! I have been very pleased with the results!

Monday, May 18, 2009

Treating Impossible Stains

Since Jessica was born, I seem to have more impossible stains in our laundry to deal with. After a lot of trial and error, I have concluded that there are two types of impossible stains with different treatment methods for each.


1) Colored stains that will not come out (coffee, spaghetti sauce, red juice, etc.)

For this type of stain I take a bucket and fill it with cold water. Then I add about 1/4 cup of bleach and mix. Then I let the item soak in the mixture until the stain is gone or mostly gone. You want to make sure that you can monitor it while it is soaking because if the item is left in the bucket for too long, it will fade. Also you do not want to have to do this too often on items with elastic because it will break down the elastic over time. While this diluted bleach mixture can be added to the washing machine, I do not do that anymore because it does not allow me as much control over how much bleach each item is getting.


2) Oil stains

Cooking with oil can be messy, particularly if you have other things going on at the same time! I tried several things to get these stains out of one of my favorite shirts. I was just about to relegate it to the rag bin when I found this solution: rub dawn (or similar dishwashing soap) into the stain and allow it to soak for 30 minutes in hot water before washing. Amazingly it works!!!!

The only kind of stain I have not been able to find a way to treat is the hard spots under the arms of my husband's shirts. I have heard some ideas for preventing them, but I have not found anything that will get rid of them once they are there. If anyone else has heard of a way to get rid of these hard spots, please let me know!!!

Monday, May 4, 2009

Laundry


We have recently changed several things about the way we do laundry. For starters, when we moved into our house, we noticed that it was taking several complete cycles to completely dry our clothes. My husband began doing some investigating and discovered that our dryer vents through the roof which makes any dryer incredibly inefficient. Unfortunately, that is not something we can change in the near future because it would involve fairly significant structural changes. Until then we have started trying to hang our laundry on a clothesline whenever possible (Sometimes we get so much rain that it is not really practical for a week!) It has worked out really well because it was taking the dryer so long to dry our clothes that sometimes they would start to smell so we are glad to not have to deal with that anymore!


I also decided recently to try making my own laundry detergent. First I heat 7 cups of water on the stove and melt .5 oz of grated soap in it. Then I pour the mixture into my container, add 4 Tablespoons of baking soda and 1 Tablespoon of borax, and shake well. So far so good!


I also made some other changes recently to the products that I keep in the laundry room. On the left is my bucket of clothespins for hanging laundry up to dry. Next I have a pink container that I use for my homemade laundry detergent. On the right I have two old gatorade containers of borax and baking soda. Both of these are ingredients in my homemade laundry detergent, but I frequently use them for other purposes. I usually put a couple tablespoons of borax in the bucket I soak cloth diapers in to act as a booster. I also will add a little baking soda to my wash cycle if the clothes are especially stinky. (or if they accidentally got left in the washer for too long!) In the front left is my mixture of 1 part fabric softener and 2 parts water with a sponge cut in half. I found this recipe online. It works pretty well when I can't hang the clothes out to dry due to inclemate weather. I squeeze excess liquid out of both and throw them in the dryer. Finally, there is the bottle of bleach. Bleach was not a standard laundry product for me until my daughter was born. I try to avoid using it because it breaks down elastic, but it is nice to be able to get the inevitable stains out of clothing so it can be worn again by later children! More on treating stains later!

Monday, April 27, 2009

Spring Cleaning

I like to keep my house fairly tidy but as far as cleaning goes, I do a really good job in the spring and fall but that is about the extent of it! Of course I wash dishes, do laundry, pick up the food from under the highchair, wipe down counter tops and bathrooms from time to time, but for the most part we only do spring and fall cleaning.

I was thinking about this the other day after reading an article about where Spring Cleaning came from. Apparently people would keep things tidy and wipe down dishes after meals but actual cleaning was saved for one day at the beginning of spring. They would take everything outside to clean and air out. Since many homes used fireplaces for heat you can imagine the kind of dirt and smell that would collect on furnishings over a long winter! How different that is from today where people feel that their homes must be immaculate all of the time!

After reading some surveys on facebook and talking with friends the other day, and I have concluded that we have done ourselves a disservice. I can't tell you how many friends I have who suffer with Obsessive Compulsive tendencies, with feelings of guilt, or with feeling like they can't have friends over at the drop of a hat because of how dirty they think their homes are.

There is also this to be considered: Are we doing our children a disservice by raising them in practically sterile environments? I have heard it said, "A little dirt never hurt anyone." In fact having a little dirt around actually helps us build up our resistance to disease!

However, probably the biggest thing to consider is: What are we giving up so that our homes can be immaculate? Is it our children, time with our spouses, doing something kind for someone else, time to sit and rejuvenate? At the end of life will it matter if you house was immaculate? I would argue no, but I would also argue that it will matter if you took time for your children, your spouse, to do something kind for someone else, and to take care of yourself. Make sure you are putting the big rocks into the jar first; the sand will fill in wherever room is left!